SQL Server to Databricks Replication
A step-by-step setup guide: connect SQL Server, configure Databricks, run the sync, and automate it.
Companion to the webinar recording: This guide is the written companion to the SQL Server-to-Databricks replication webinar. It stands on its own: use it to set up and run the sync end to end, whether or not you watched the session. Each step maps to the DBSync Cloud Replication console, with links to the full documentation where you may want more detail.
Why replicate SQL Server to Databricks?
SQL Server is built to run transactions, not to power large-scale analytics, data science, and ML. Landing a structured copy of that data in Databricks gives your team a lakehouse foundation built for exactly that:
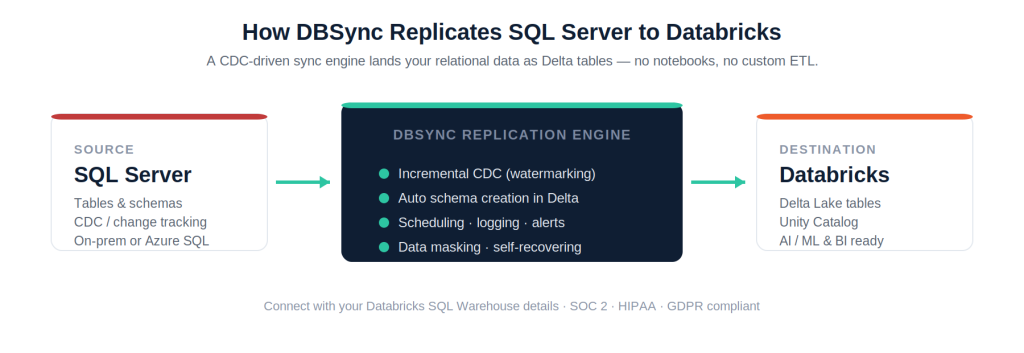
The setup at a glance: 4 phases, 7 steps
Every connector sync in DBSync Cloud Replication follows the same four phases. This guide walks each one; the table is your map.
| Phase | Step | What happens |
|---|---|---|
| Connect | 1. Connect SQL Server (source) | Add SQL Server as a data source with its connection details. |
| Connect | 2. Connect Databricks (target) | Enter the Databricks connection details from your SQL Warehouse; test it. |
| Configure | 3. Select objects & fields | Choose which SQL Server tables and columns to replicate. |
| Run | 4. Update Schema | Create the matching Delta table structure in Databricks. |
| Run | 5. Clean Copy | Load a full baseline copy of the data into Delta. |
| Run | 6. Source to DB | Switch to incremental CDC syncs of new and changed records. |
| Automate | 7. Schedule & notify | Automate the sync on a schedule and turn on alerts. |
The full walkthrough
Each step below follows the same rhythm: what it does, why it matters, how to do it in DBSync, and what to watch out for.
Step 1 — Connect SQL Server (source)
- In the Cloud Replication console, click Add App, choose SQL Server as the data source, and create a profile.
- Enter the host, port, database name, and credentials. The JDBC URL auto-fills from these details.
- Click Save, then test the connection.
| Watch out forUse a login with read access to the tables you’ll replicate. If your SQL Server is on-prem behind a firewall, run the on-prem version of DBSync (or whitelist the connection) so it can reach the instance. |
Step 2 — Connect Databricks (target)
- Click the Database icon in the top navigation toolbar and select Databricks as the target.
- In Databricks, open SQL Warehouse → Connection details — this is where all the required connection information lives.
- Back in DBSync, provide the Host, Port, Username, Password, Database name, and Schema, API access token etc. The connection URL auto-fills from these details.
- Click Save, then test the connection.
| Watch out forUse a token/user with rights to create tables in the target schema. Make sure the SQL Warehouse is running (or set to auto-start) when a sync fires, or the connection will wait and can time out. Full step-by-step with screenshots is in the Databricks target-setup doc linked at the end. |
Step 3 — Select objects & fields
- Click Objects in the top navigation toolbar.
- Select the SQL Server tables to sync from the left panel.
- In Available Fields, pick the columns to include; use Exclude Fields to drop the ones you don’t need.
| Watch out forInclude each table’s primary key — it’s what DBSync uses to match rows on incremental syncs and to merge updates cleanly into the Delta table. Very wide or LOB-heavy columns can slow the initial load; replicate them only if downstream analytics actually needs them. |
Steps 4–6 — Run the sync
- Update Schema — creates the SQL Server table structure as Delta tables and columns in your Databricks catalog, with matching data types.
- Clean Copy — loads a full baseline copy of the records into those Delta tables.
- Source to DB — performs the incremental CDC sync, moving only records changed since the last run.
| Why this mattersAfter the initial Clean Copy, DBSync tracks changes with a watermark, so ongoing Source-to-DB syncs pull only new or changed rows and merge them into the Delta tables — fast, and light on both SQL Server and your Databricks compute. There’s no notebook to write and no manual schema mapping between SQL and Delta types. |
Step 7 — Schedule & notify
- Open the Scheduler Jobs tab in the top navigation toolbar.
- Create a task: set a name, choose the command (e.g. Source to DB), pick a frequency from the Repeat menu, and set the start date and time.
- Click Save. Then set up email or webhook notifications so you’re alerted on schema changes or errors.
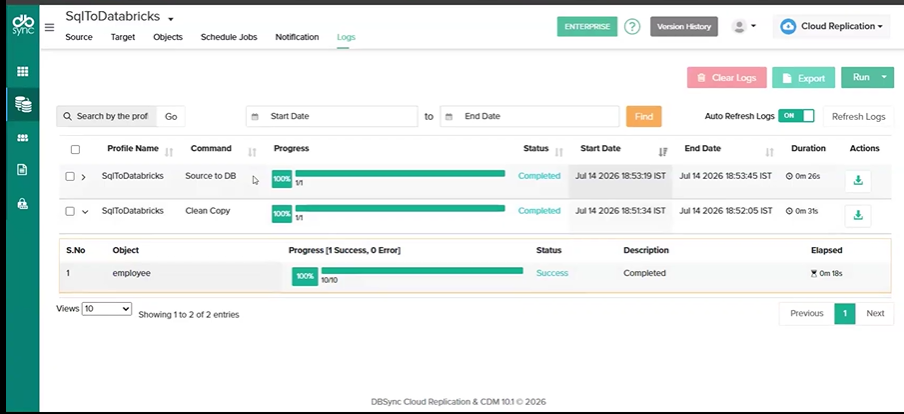
DBSync execution logs capture every run at record level — your proof the scheduled sync is healthy.
Watch it Live
Watch our team build this replication live in the on-demand webinar below.
Best practices for a bulletproof sync
| Practice | Why it matters |
|---|---|
| ✓ Start with a baseline check | Run a full Clean Copy and confirm row counts match on both sides before scheduling. |
| ✓ Automate, then walk away | Use the scheduler for hourly, nightly, or weekly runs so freshness doesn’t depend on memory. |
| ✓ Right-size the Databricks compute | Point at a SQL warehouse / cluster sized for the load, and let it auto-start so syncs don’t stall. |
| ✓ Turn on proactive alerts | Email or webhook notifications tell you about schema changes or errors the moment they happen. |
| ✓ Replicate only what you need | Fewer tables and columns mean faster syncs and lower Databricks compute cost. |
Where DBSync does the heavy lifting
The parts of a SQL-Server-to-Databricks pipeline that eat engineering time in a hand-built setup are handled for you — which is the whole point of using a connector instead of writing one.
| Handled automatically | What you still decide |
| Schema creation in DatabricksSQL-to-Delta data type mappingIncremental, CDC syncSchema-drift detection as tables changeSelf-recovering runs with loggingData masking for sensitive columns | Which tables and columns to replicateSync frequency and schedule windowsTarget catalog, schema, and compute sizeWho receives error and schema-change alertsWhen to run a full Clean Copy vs. incrementalWhether to run on-prem or cloud DBSync |
Complete setup & further reading
For the full click-by-click setup and to go deeper on each step, use these official DBSync resources. The first is the exact Databricks target-setup page this guide is based on.
- Setting up your Database Instance with Databricks (target setup)
- Target Setup overview — all supported targets
- Objects — selecting tables & fields to replicate
- Scheduler for Replication — automating your syncs
- Notifications — email & webhook alerts
- Logs — monitoring and verifying runs
- CDC Database Replication — enabling change data capture
- SQL Server to Databricks — product overview
The bottom line
Standing up Databricks is the easy day. Keeping it fed with fresh, accurate data from SQL Server is the part that quietly eats engineering time — extract scripts, delta logic, schema mapping, and the 3am pages when a column changes upstream. DBSync takes that off your plate: connect once, run a Clean Copy, then let incremental CDC keep your Delta tables current on a schedule.
Start with the connect and Clean Copy steps to prove the baseline matches, then schedule incremental syncs and turn on alerts. Within an afternoon you’ll have SQL Server data landing in Databricks that your analytics, BI, and ML workloads can trust.
| Ready to run your first sync?Start free, explore the Replication Playground, or book a personalized demo.SQL Server to Databricks | Try the Playground | Setup Docs |